


Why does pump alignment matter for pump performance and longevity? One of the most overlooked, yet crucial, aspects of ensuring pump reliability and efficiency is proper pump alignment. Misalignment is one of the leading causes of pump failure, leading to costly downtime, excessive maintenance, and even catastrophic equipment damage. In the world of industrial pumping systems, precision is everything.
Pump alignment isn’t just about lining up two shafts—it starts with the foundation, continues through baseplate leveling and securing, proper mounting and alignment, and ends with stress-free piping installation. Alignment matters, and each step in the process impacts the performance and lifespan of your pumps.
In this article, we will cover:
- Why Pump Alignment Matters
- When to Perform Pump Alignment
- Steps to Ensure Proper Pump Alignment
- Foundation Preparation: The First Step to Reliable Alignment
- Baseplate Leveling and Securing
- Proper Pump-to-Driver Shaft Alignment
- Types of Misalignment
- Steps to Achieve Proper Pump-to-Driver Shaft Alignment
- Ongoing Checks
- The Role of Proper Piping Installation in Maintaining Alignment
- How Pipe Strain Happens
- Best Practices for Piping Installation
- Troubleshooting Alignment
- Ongoing Pump Alignment
Why Pump Alignment Matters
Pump alignment refers to positioning the pump and its driver (typically a motor) so that their rotating shafts are precisely in line with each other. Even slight misalignment can lead to big problems.
Proper alignment ensures smoother operation, lower maintenance costs, better energy efficiency, and longer equipment life—making it a must for any facility that values reliability.
- Reduced Vibration and Noise. Misaligned shafts create uneven rotational forces, causing harmful vibrations that can be felt in the pump and surrounding equipment. Vibration also increases noise levels, which can be a nuisance and potentially harmful.
- Increased Component Life. Proper alignment reduces stress on bearings, seals, and couplings. This leads to extended component life and reduced need for replacement. By minimizing wear and tear, alignment helps prevent unexpected breakdowns.
- Improved Energy Efficiency. Misalignment increases friction within the pump, requiring more energy to operate. Correctly aligned pumps operate more efficiently, resulting in lower energy consumption and cost savings.
- Preventing Premature Failure. Misalignment can lead to a cascade of problems, including bearing failure, seal leaks, and coupling damage. These issues can escalate quickly, potentially leading to a complete pump failure. Regular alignment checks and adjustments can prevent these problems and extend the pump’s operational life.
- Cost Savings. By preventing failures and reducing energy consumption, proper alignment leads to significant cost savings. These savings come from reduced maintenance and repair costs, as well as lower energy bills.
Proper pump alignment is crucial for optimal pump performance, energy efficiency, and equipment longevity. Misalignment of a pump can lead to increased vibration, premature wear and tear on components, and higher energy consumption. Maintaining accurate alignment helps prevent costly repairs and downtime.
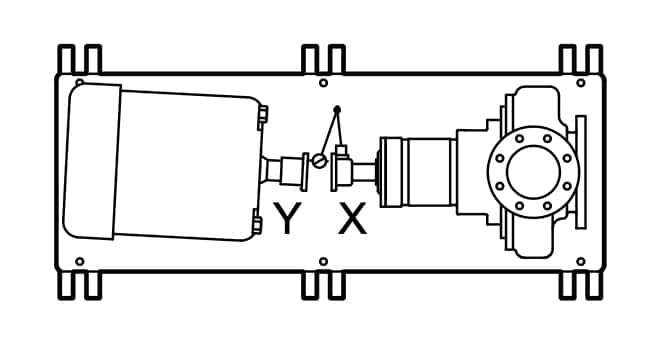
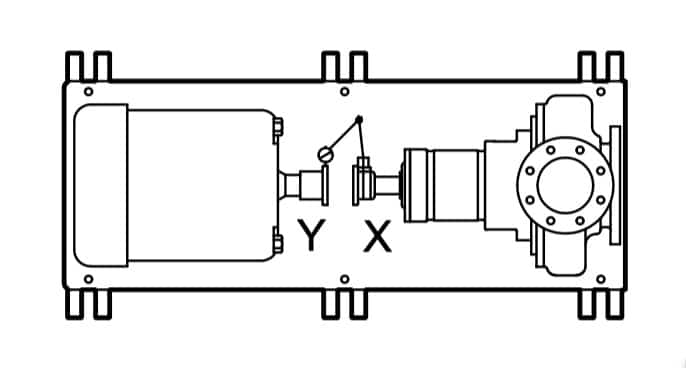
Examples of incorrect pump alignment – courtesy ITT Goulds
When to Perform Pump Alignment
Pump alignment is a critical factor in ensuring efficient, reliable, and cost-effective pump operation. Regular alignment checks and adjustments are essential for maximizing pump life and minimizing operational costs. Pump-to-driver alignment should be checked:
- During installation
- When the process temperature changes
- When the piping changes
- When the pump is serviced
Generally, pump alignment requires addition or removal of shims under the feet of equipment, as well as shifting equipment horizontally. Both initial alignment and final alignment are at times necessary to complete the cycle of checking and adjusting the pump.
Initial alignment (or cold alignment) should be performed:
- Before grouting the baseplate to make sure that it is possible to complete alignment
- After grouting the baseplate to make sure the alignment hasn’t changed during grouting
- After connecting piping to ensure that piping has not affected the initial alignment (which may require piping alterations to remove pipe strains on pump flanges)
Final alignment (or hot alignment) should be performed:
- After the first run to ensure that alignment is correct when both the pump and the pump driver are at operating temperature
- Periodically according to operating procedures
The exact alignment criteria varies depending on the pump model, but final alignment should be measured at operating temperature. During installation, it may be necessary to set the parallel alignment in the vertical direction to a different criteria due to differences in expansion rates of the pump and driver, depending on the pump temperature and type of driver.
Steps to Ensure Proper Pump Alignment
Actual pump alignment procedures vary from pump to pump based on the type of pump and configuration, so it’s important to always refer to manufacturer instructions for specific pump alignment procedures. Generally, though, the overall process of pump alignment is the same.
Watch the Viking Pump Alignment video for an overview of alignment steps.
Foundation Preparation: The First Step to Reliable Alignment
Alignment begins long before the pump is installed. A stable, well-prepared foundation is essential for maintaining alignment over time.
A pump foundation absorbs operational forces and isolates vibration from surrounding equipment. An unstable or uneven foundation will settle or shift, knocking the pump out of alignment and leading to chronic problems.
These are the key steps in preparing a pump foundation.
- Evaluate the site: Ensure soil stability and load-bearing capacity.
- Use the right materials: Typically, reinforced concrete is poured to support the pump skid.
- Allow for proper curing: Installing equipment on a foundation that hasn’t cured fully leads to uneven settling.
- Check flatness and level: Precision instruments ensure the foundation is perfectly level before pump installation.
Common mistakes like skipping leveling checks or rushing the curing process can doom alignment from the start. Even the best alignment tools can’t compensate for a poor foundation.
Baseplate Leveling and Securing
The baseplate is the bridge between the foundation and the pump. If it isn’t level and rigidly secured, alignment will be impossible to achieve—or maintain.
Follow manufacturer instructions for the type of foundation and attachment, as steps will differ depending on whether shims or wedges, jackscrews, or spring mounting are used. One simple method requires two machinist’s levels to ensure that the baseplates and level mounting pads are adjusted to level in each direction.
Tips for proper leveling include:
- Precision leveling: Use dial indicators or laser levels to check for flatness across the entire baseplate.
- Correct grouting: Fill all voids with non-shrink grout to eliminate movement and provide rigid support.
- Re-check after curing: Grouting can shift slightly as it sets, so final checks are critical.
Improper baseplate installation creates several risks. An uneven baseplate can distort the pump casing, create soft foot conditions, and lead to excessive vibration and component wear. Proper baseplate installation sets the stage for long-term alignment success.
Proper Pump-to-Driver Shaft Alignment
With a solid foundation and level baseplate, it’s time to focus on the pump and driver shafts themselves.
Types of Misalignments
Several types of pump-to-driver misalignments can occur:
- Angular misalignment: Shafts are at an angle to each other.
- Parallel (offset) misalignment: Shafts are displaced horizontally or vertically.
- Combination misalignment: Both angular and offset errors occur simultaneously.
Aligning a pump requires checking and adjusting each of these alignment types.
Steps to Achieve Proper Pump-to-Driver Shaft Alignment
Over the years, many pump shaft alignment tools and methods have evolved. The primary alignment tools, from least accurate to most accurate, are straight edges, rim-face dial indicators, reverse dial indicators, and highly accurate laser alignment.
- Soft foot correction. Ensure all mounting feet make full, even contact with the baseplate. Shim if necessary.
- Preliminary alignment. Use straight edges and visual gap inspection with feeler gauges for a rough setup, testing each type of alignment in turn:
- angular alignment for vertical and then horizontal correction
- parallel alignment for vertical correction and then horizontal correction
- complete alignment for vertical and then horizontal correction
- Precision alignment. Dial indicators or laser alignment tools fine-tune positioning to meet manufacturer tolerances.
- Thermal growth adjustments. Account for expansion of components during normal operation to maintain alignment under running conditions.
Ongoing Alignment Checks
Alignment isn’t set-and-forget. Operational vibrations, settling foundations, and routine maintenance can all shift alignment. Regular checks help prevent problems before they become costly failures.
The Role of Proper Piping Installation in Maintaining Alignment
Even perfect alignment can be destroyed by poor piping practices. Pipe strain—unwanted forces transmitted from connected piping to the pump casing—can distort the pump and pull it out of alignment.
How Pipe Strain Happens
Pipe strain can occur in a number of ways:
- Forcing misaligned flanges together during installation.
- Allowing unsupported piping to put weight on the pump nozzles.
- Ignoring thermal expansion, causing pipes to shift and pull on the pump.
Best Practices for Process Piping Installation
The guidelines for process piping in the “Hydraulic Institute Standards” available from the Hydraulic Institute are recommended reading prior to pump installation.
Best practices for piping installation include:
- Independent supports: The pump should not carry the weight of the piping.
- Proper flange alignment: Pipes should meet the pump connection naturally, without forcing.
- Expansion joints: Use expansion joints where necessary to accommodate thermal growth and movement.
In addition, ensure that grout has hardened and all pump and driver hold-down bolts are tightened before connecting piping to the pump.
By eliminating pipe strain, you protect your pump casing from distortion and keep alignment intact for the long term.
Watch this Viking Pump Piping video for an overview of proper piping to ensure pump alignment.
Troubleshooting Pump Alignment
If horizontal, angular, or parallel alignment cannot be obtained, the cause is often one of two reasons.
- If the driver feet bolt is bound, loosening the bolts that hold the pump down and sliding the pump and the driver will help achieve horizontal alignment.
- If the baseplate is twisted or otherwise improperly leveled, adding or removing shims can help achieve realignment after determining which corners of the baseplate are low or high.
Ongoing Pump Alignment
Pump alignment is not a single task; it’s a process that begins before installation and continues throughout the life of the pump. A well-prepared foundation, level and secure baseplate, precise shaft alignment, and properly installed piping work together to ensure reliable, efficient pump operation.
Neglecting alignment costs far more in downtime, repairs, and energy waste than doing it right from the start. By investing time and resources in proper installation and alignment practices—and making routine checks part of your maintenance program—you protect your pumps, your budget, and your plant’s productivity.
Additional Resources
ITT Goulds Installation Manual Alignment Detailed Excerpt
Contact Us for Alignment Assistance


